
目次
まずはじめに
とあるブラウザのレイアウト修正依頼が来て、その内容が申請書の入力項目に「会社名」などを入力するところが現状<input>になっているが、<textarea>に修正してほしいとのこと。
理由として、入力後に印刷するので<input>だと長い会社名の場合、1行しか書けないので見切れてしまう可能性がある為です。
元々のソースコードを見てみると、一部の入力欄には<textarea>が使用されており、その中にはunderlineがついている事に気づきました。私は<textarea>にunderlineを入れたことがなかったので感心しました。(<textarea>にはunderlineを行ごとに引くことができない為です)
なので、現状の<input>部分を<textarea>に変更&<textarea>に割り当てているclassを付与すれば完了。すぐに終わる作業だと思っていました。
そして完了の報告をする為にちゃんと動作するのか確認作業に入りました。
入力や動作は問題なく動いたので最後に印刷がちゃんとできるのか見ていたら、ふと違和感に気付きました…。
よろしければ皆さまの環境でも試してみてください。
以下はその時のコードを模倣した一例になります。(全体のコードは最後にお見せします)
HTMLとCSSのみでTextareaにunderlineを引く
【HTML】
<section id="before">
   <h2>Before</h2>
   <div class="addressTextarea">
      <table>
         <tbody>
            <tr class="address">
               <th>
                  <h3>会社名</h3>
               </th>
               <td colspan="3">
                  <textarea name="addr">ガリレオアンドヴィーナス合同会社</textarea>
               </td>
            </tr>
         </tbody>
      </table>
   </div>
</section>

<!-- 実際に確認したい方はこちらのボタンを挿入してみてください -->
<form>
   <input type="button" value="印刷ページを表示する" onclick="window.print();">
</form>
【CSS】(大事なclassのみ抜粋)
.address {
  background-image: linear-gradient(0deg, transparent 1px, #00307D 2px, transparent 1px);
  background-size: 100% 2rem;
}

textarea {
  border: 1px solid rgba(0, 48, 125, 0.5);
  border: unset;  // テキストエリアの枠borderが不要の方は上記のborderを消すかこちらを付与してください
  border-radius: 5px;
  min-width: 100%;
  min-height: 6rem;     // 1行2remとしているので3行分デフォルトで表示したい場合は6remを設定しておく(基本不要です)
  padding: 0 2mm;
  line-height: 2rem;  // テキストエリア1行の高さ(重要です)
  background-color: unset;     // 背景色があるとunderlineが見えなくなります
  overflow: hidden;
  resize: vertical;
}

/* 印刷用のcss(必要な方) */
@media print {
  textarea {
    border: none;
    resize: none;
  }
}
【出力結果】入力などしてみてください!
Before
|
会社名 |
|---|
入力したりテキストエリアを下にさげてみてください(最大15行まで) ↑
【Before】一見良さそうに見えるが落とし穴がある
見た目は悪くなさそうです。しかし、よく見ると先ほど言った違和感に気付けたでしょうか?
勘の良い方であればcssのコードを見て既にお気づきかもしれませんがborderの代わりにbackground-imageでグラデーションを使っています。
このグラデーションがunderlineの正体なのですが、若干滲んでいるように見えますでしょうか?
実際画面とにらめっこをしてもわかりづらいのでPDF化や印刷にかけてみるとunderlineの色にばらつきがあることがわかりやすいかと思います。(線の色に薄い部分と濃い部分が一律では無い感じ?)
何をどうしても原因を直すことができなかったのでjQueryで直接underline(border)を引くことにしました。
以下がjQueryで書いた修正版です。
jQueryを使って改行した/された時に次の行を生成する
【HTML】
<section id="after">
   <h2>After</h2>
   <div class="addressTextarea">
      <table>
         <tr class="address">
            <th>
               <h3>会社名</h3>
            </th>
            <td colspan="3">
               <textarea class="auto_resize" name="addr">ガリレオアンドヴィーナス合同会社</textarea>
               <div class="container">
                  <div class="underline" style="top: 2rem;"></div>  <!-- 初期設定 -->
                  <div class="underline" style="top: 4rem;"></div>  <!-- 初期設定 -->
                  <div class="underline" style="top: 6rem;"></div>  <!-- 初期設定 -->
               </div>
            </td>
         </tr>
      </table>
   </div>
</section>

<!-- 実際に確認したい方はこちらのボタンを挿入してみてください -->
<form>
   <input type="button" value="印刷ページを表示する" onclick="window.print();">
</form>
【CSS】(大事なclassのみ抜粋)
.address {
  background-image: linear-gradient(0deg, transparent 1px, #00307D 2px, transparent 1px);
  background-size: 100% 2rem;
}

textarea {
  resize: none;          // テキストエリアを手動で広げられないようにした
  min-width: 100%;
  min-height: 6rem;        // 後ほど説明しますが、ここでは最低3行分の高さとして設定しています
  max-height: 30rem;       // こちらは不要です(最大行数:30rem / 2rem = 15行)
  padding: 0 2mm;
  line-height: 2rem;       // 1行の高さ
  background-color: unset; // 背景色が設定されていると裏側のunderlineが見えなくなるので外しています
  overflow: hidden;
  resize: vertical;
}

.container {
  position: absolute;
  top: 0;
  right: 0;
  width: 100%;
}

.container .underline {
  position: absolute;
  bottom: 0;
  left: 0;
  width: 100%;
  border-bottom: 1px solid #00307D;
}
【jQuery】
jQuery(function ($) {
   $(function () {
      // ユーザーが選択しているテキストエリアにauto_resizeクラスが付いていたら、そのテキストエリアの高さを再設定する
      $(document).on('input', 'textarea.auto_resize', function () {
         this.style.height = 'auto';                    // 高さをリセットする
         this.style.height = this.scrollHeight + 2 + 'px';  // テキストエリアの要素分の高さをセットする
         underlineTextarea($(this));
      });

      // テキストエリアの高さ分だけunderlineを引くメソッド
      function underlineTextarea(textarea) {
         const container = textarea.closest('#after');               // #after要素を取得
         const underlineContainer = container.find('.container');    // #after要素内からクラスが.containerの要素を取得
         underlineContainer.empty();                                 // .container内の.underline要素を削除(厳密には内部の要素全て)
         const lineHeight = parseFloat(textarea.css('line-height'));  // テキストエリアのline-heightの値を取得
         let lines = Math.floor(textarea[0].scrollHeight / lineHeight);       // テキストエリアの高さ / line-heightの高さ = 必要なunderline数

         // underline数が3以下だったらunderlineを3本引く
         if (lines <= 3) {
            lines = 3;
            for (let i = 1; i <= lines; i++) {
               const underline = $('<div class="underline"></div>');
               underline.css({
               top: (i) * lineHeight + 'px',
            });
               underlineContainer.append(underline);   // .container内に.underlineを生成する
            }
         }

         // underline数が3以上だったら必要分のunderlineを引く
         if (lines > 3) {
            for (let i = 1; i <= lines; i++) {
               const underline = $('<div class="underline"></div>');
               underline.css({
               top: (i) * lineHeight + 'px',
               });
               underlineContainer.append(underline);   // .container内に.underlineを生成する
            }
         }
      }
   });
});
【出力結果】入力などしてみてください!
After
|
会社名 |
|
|---|
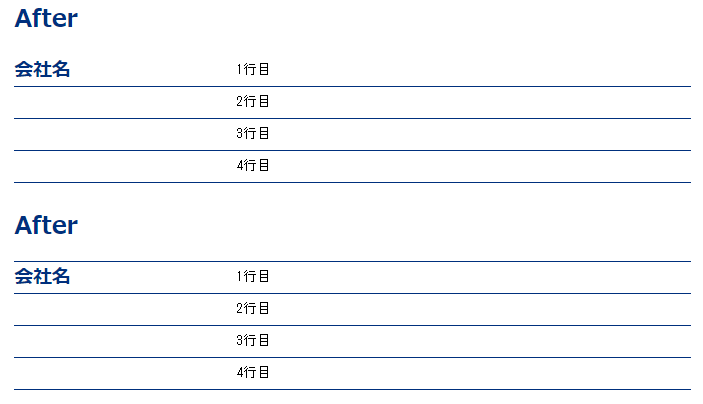
【After】線はハッキリし、改行で高さも変わるようになりました
実際に印刷をかけてみましたが、問題なく線が滲みませんでした。
なぜ、グラデーションは滲んでborderだと滲まないのか… …答えは簡単です。
グラデーションは特定のカラーから透明にかけてグラデーションがかかっているので印刷では滲んで見えるのに対して、borderは1色のみで直線を書いているので滲みません。
更に<textarea>の右下をマウスでドラッグしてエリアを上下にリサイズしていましたが、エンターで改行、あるいは文字を右端まで打つことで勝手に改行するように改良しています。
キーワードはline-height
ちなみに気になっている方がいらっしゃるかもしれませんが、ここまで説明してきたcssの中に「line-height」がいくつかあったと思います。
実はこれらを基準に改行する位置をjQueryで制御しています。
【line-heightで1行の高さを設定している】
<textarea>のline-height: 2rem;
<div class=”container”>内の<div class=”underline”>の初期値も2rem
高さは任意の値を設定することができますが、どちらも変更しないと違和感が生まれるので注意です。
ただし、最初の時点から<div class=”underline”>を生成しないのならhtml側の<div class=”underline”>を削除するだけで結構なので、設定するline-heightは<textarea>のみで問題なし。
予め1本でも引いておきたいという方はunderlineを残しておきましょう。
【jQuery】解説
前提条件として
まずはお話をしていない部分も含めて情報を整理します。
【 依頼内容 】
1.行数が長くなりそうなところ & <input>タグのところを<textarea>にしてほしい
2.行数を最低3行表示してほしい(文字の有無関係なく)
【 修正する上で気づいた修正部分 】
1.background-image: linear-gradientでunderlineを引くことで線が滲んでいる
2.<textarea>の各行にはborderを引くことができない
【 こうしたほうが良いなって思って改良した部分 】
1.入力している内容が2行目に突入するとき、ちゃんと2行目以降に続くようにする
→ 今までマウスで<textarea>の隅をドラッグしてエリアを広げていた(勝手に広がらなかった)
2.そもそもマウスで改行するのは手間なので右端で勝手に改行するようにする
これらの条件を前提に解説を進めていきます。
auto_resizeクラスを持ったTextareaに対する動作
最初に1行分の高さを取得し、2行目以降を自動で生成する為の下準備をします。
以下のソースはauto_resizeというクラスを持つ<textarea>に入力したとき発生するものです。
入力することで高さに変動が起こった時に高さを初期化し、改めて<textarea>の枠を高さを設定することで行数が増えるたびに<textarea>の高さが変わって見えるようになっています。
// ユーザーがテキストエリアを選択した時に作動するメソッド
$(document).on('input', 'textarea.auto_resize', function () {
   this.style.height = 'auto';                    // テキストエリアの高さをリセット
   this.style.height = this.scrollHeight + 'px';  // テキストエリアの要素分高さを設定する
   underlineTextarea($(this));
});
underlineを引くunderlineTextareaメソッド
次にunderlineTextareaについて説明します。
こちらのソースは各行にunderlineを引くためのものになっています。
ユーザーが操作<textarea>したからID #after内の要素を取得し、const containerという値に代入しています。その取得した要素の中から.container要素を探し、const underlineContainerに代入しています。
これは下線を追加するためのコンテナ要素です。
// #after要素を取得
const container = textarea.closest('#after');
// #after要素内からクラスが.containerの要素を取得
const underlineContainer = container.find('.container');
次に.container要素の中身をクリア(container内のunderlineをすべて消去)し、<textarea>に設定されているline-heightの値を取得することでunderline(border-bottom)を行の高さに合わせて引くことができます。この時、<textarea>の高さに応じて生成するunderline数を計算しています。
// .container内の.underline要素を削除(厳密には内部の要素全て)
underlineContainer.empty();
// テキストエリアのline-heightの値を取得
const lineHeight = parseFloat(textarea.css('line-height'));
// テキストエリアの高さ / line-heightの高さ = 必要なunderline数
let lines = Math.floor(textarea[0].scrollHeight / lineHeight);
IF文の条件式
今回は最低3行は表示してほしいと注文されていたので<textarea>の高さ / lineHeightの値で割り、何本underlineが必要か計算し、lines変数に格納してIF文でどうするのか判定しています。
【IF文】
lines <= 3 だった場合はlinesに3を代入してfor文で3回分underlineを引く動作
lines > 3 だった場合は割った数の分だけfor文でunderlineを引く動作
ちなみにIF文をelseで分けなかったのは片方必要なくなった時などに簡単に外すことが出来るかなと思ったのでそうしました。ここはみなさんがやりやすい書き方で良いかなと思います。(switchなどでも良いかと)
IF文の条件は違えど判定した後の内容はどちらも同様です。
// underline数が3以下だったらunderlineを3本引く
if (lines <= 3) {
   lines = 3;
   for (let i = 1; i <= lines; i++) {
      ~次で説明します
   }
}

// underline数が3以上だったら必要分のunderlineを引く
if (lines > 3) {
   for (let i = 1; i <= lines; i++) {
      ~次で説明します
   }
}
underlineを生成するfor文の動作
必要なunderlineの数(<div class=”underline”>)を<div class=”container”>の中にfor文で生成しています。
for文の条件式の初期値が” i = 1 “となっていますが、これは0行目の分を生成しないように予め設定しているものになります。つまり一番上にもborderが欲しい場合は” i = 0 “を初期値にしてください。
// underlineを3本引くまで終了しない
for (let i = 1; i <= lines; i++) {
   const underline = $('');  // underlineを格納する箱を生成
   underline.css({
      top: (i) * lineHeight + 'px',  // underlineのcssにunderlineを引く位置を代入する
   });
   underlineContainer.append(underline);  // <div class="container"></div>内にunderlineを追加する
}

// linesに代入されている数の分のunderlineを引き終わるまで終了しない
for (let i = 1; i <= lines; i++) {
   const underline = $('<div class="underline"></div>');
   underline.css({
      top: (i) * lineHeight + 'px',  // underlineのcssにunderlineを引く位置を代入する
   });
   underlineContainer.append(underline);  // <div class="container"></div>内にunderlineを追加する
}
 上が i = 1; の場合(0行目に線なし) 下が i = 0; の場合(0行目に線あり)
HTMLにcontainerと初期値に必要なunderlineを用意する
Afterの時にHTMLコードの所ですでに赤字で載せていたり、これまでの説明の中ですでに何度かお話ししていますが、例えば「container」という箱と箱にしまう「underline」というものが必要になります。
(underlineを入れるかどうかはあなた次第です)
containerはjQueryで書いたunderlineTextareaメソッドで必要になります。
なので必ずこの箱を作らないと中にunderlineを生成することができません。
また、どこのcontainerか判断する”ID名”または”親クラス”も必要になります。
// jQueryで参照するために設定したID名(after)
<section id="after">
   <h2>After</h2>
   <div class="addressTextarea">
      <table>
         <tr class="address">
            <th>
               <h3>会社名</h3>
            </th>
            <td colspan="3">
               // ID:after内のテキストエリア
               <textarea class="auto_resize" name="addr">ガリレオアンドヴィーナス合同会社</textarea>
               // ID:after内のテキストエリア内のcontainer
               <div class="container">
                  // このcontainer内にunderlineを生成する
                  // 最初からborderが要らない場合は削除してもよいですが、1本分は用意しておいても良いかも
                  <div class="underline" style="top: 2rem;"></div>
                  <div class="underline" style="top: 4rem;"></div>
                  <div class="underline" style="top: 6rem;"></div>
               </div>
            </td>
         </tr>
      </table>
   </div>
</section>
まとめ
ひと通り説明が終わったところで簡単にまとめて、私が書いた全てのコードを記載します。
【 HTML 】ではcontainerという箱とunderlineという中身が生成される
【 CSS 】ではline-heightを一律で設定する(underlineの高さと同じになるようにする)
【 jQuery 】では行ごとにテキストエリアの高さを変更し、その度にunderlineをcontainerの中に生成する
あとはオリジナルで色々追加してみて下さい!
それぞれのファイル名
index.html
style.css
autoBorder.js
【HTML】index.html
<!DOCTYPE html>
<html lang="ja">
<head>
  <meta charset="UTF-8">
  <meta name="viewport" content="width=device-width, initial-scale=1.0">
  <link rel="stylesheet" href="css/style.css">
  <title>Textareaにunderlineを引くjQuery【CSS・jQuary】</title>
</head>

<body>
  <main>
    <section id="after">
      <h2>After</h2>
      <div class="addressTextarea">
        <table>
          <tr class="address">
            <th>
              <h3>会社名</h3>
            </th>
            <td>
              <textarea class="auto_resize" name="addr">ガリレオアンドヴィーナス合同会社</textarea>
              <div class="container">
                <div class="underline" style="top: 2rem;"></div>
                <div class="underline" style="top: 4rem;"></div>
                <div class="underline" style="top: 6rem;"></div>
              </div>
            </td>
          </tr>
        </table>
      </div>
    </section>

    <form>
      <input type="button" value="印刷ページを表示する" onclick="window.print();">
    </form>
  </main>

  <script src="https://code.jquery.com/jquery-3.6.0.min.js"></script>
  <!-- 各ファイルのURLはご自身の状況に合わせて変更してご使用ください -->
  <script src="js/autoBorder.js">
  </script>
</body>
</html>
【CSS】style.css
* {
  padding: 0;
  margin: 0;
  box-sizing: border-box;
}

main {
  width: 100%;
}

table {
  border-collapse: collapse;
  border-spacing: 0;
}

textarea {
  border: 1px solid rgba(0, 48, 125, 0.5);
  border-radius: 5px;
  min-width: 100%;
  min-height: 6rem;
  padding: 0 2mm;
  line-height: 2rem;
  background-color: unset;
  overflow: hidden;
  resize: vertical;
}

h2, h3 {
  color: #00307D;
  word-break: keep-all;
}

h3 {
  padding-right: 1rem;
}

#after {
  position: relative;
  top: 0;
  width: 100%;
  max-width: 50%;
  margin: 0 auto;
}

#after h2 {
  margin: 1rem 0;
}

.address {
  line-height: 2rem;
}

.addressTextarea {
  display: flex;
  flex-direction: column;
  justify-content: center;
}

.address th {
  text-align: left;
  line-height: 2rem;
  display: flex;
  align-items: flex-start;
}

#after .address {
  line-height: 2rem;
  position: relative;
  width: fit-content;
  overflow: hidden;
}

#after textarea {
  resize: none;
}

#after .container {
  position: absolute;
  top: 0;
  right: 0;
  width: 100%;
}

#after .container .underline {
  position: absolute;
  bottom: 0;
  left: 0;
  width: 100%;
  border-bottom: 1px solid #00307D;
}

form {
  text-align: center;
  margin: 3rem 0;
}

form input {
  padding: 5px 8px;
  background-color: #00307D;

  border: none;
  color: white;
  -webkit-transition: 0.5s;
  transition: 0.5s;
}

form input:hover {
  background-color: #666666;
}

@media print {
  textarea {
    border: none;
    resize: none;
  }

  form {
    display: none;
  }
}

@page {
  margin: 0;
}
【jQuery】autoBorder.js
jQuery(function ($) {
  $(function () {
    $(document).on('input', 'textarea.auto_resize', function () {
      this.style.height = 'auto';
      this.style.height = this.scrollHeight + 'px';
      underlineTextarea($(this));
    });

    function underlineTextarea(textarea) {
      const container = textarea.closest('#after');
      const underlineContainer = container.find('.container');
      underlineContainer.empty();
      const lineHeight = parseFloat(textarea.css('line-height'));
      let lines = Math.floor(textarea[0].scrollHeight / lineHeight);

      if(lines <= 3) {
        lines = 3;
        for (let i = 1; i <= lines; i++) {
          const underline = $('<div class="underline"></div>');
          underline.css({
            top: (i) * lineHeight + 'px',
          });
          underlineContainer.append(underline);
        }
      }

      if(lines > 3) {
        for (let i = 1; i <= lines; i++) {
          const underline = $('<div class="underline"></div>');
          underline.css({
            top: (i) * lineHeight + 'px',
          });
          underlineContainer.append(underline);
        }
      }
    }
  });
});
最後にみなさんへ
いかがだったでしょうか?
理解が難しかった方はまずは私と同じように作ってみて色々触ったり、改造したり好きに遊んでみてください。
どの職種にも言えることだと思いますが、こういった少し特殊な注文がお客様から度々来ることがあると思います。
そういった事がある度に「無理だろ」や「面倒くさい」と言わずに「どうやったら作れるだろう」とか「どう書くか分からないけどこういう風に組めれば行けそう」みたいに考えられるようになってくるとだんだんコーディングの勉強が楽しくなってきます。
私もまだまだ覚えることが多いので皆さん一緒に頑張りましょうね!
おまけ(SCSSも紹介)
勉強がてらcssを書く際にSCSSで書いてみたので気になる方はこちらもご覧ください。
SCSSの使い方については…ご自身でまずは調べてみて活用してみてください!
(過去のBLOGに無かったのでいつか紹介できる日が来るかもしれませんね…乞うご期待!)
念のためブラウザに映して確認し、見た目は同じですが、もしかしたら一部内容が違うかもしれません…m(__)m
style.scss
* {
  padding: 0;
  margin: 0;
  box-sizing: border-box;
}

main {
  width: 100%;
}

table {
  border-collapse: collapse;
  border-spacing: 0;
}

textarea {
  border: 1px solid #00307d78;
  border-radius: 5px;
  min-width: 100%;
  min-height: 6rem;
  padding: 0 2mm;
  line-height: 2rem;
  background-color: unset;
  overflow: hidden;
  resize: vertical;
}

h2,h3 {
  color: #00307D;
  word-break: keep-all;
}

h3 {
  padding-right: 1rem;
}

#after {
  position: relative;
  top: 0;
  width: 100%;
  max-width: 50%;
  margin: 0 auto;

  h2 {
    margin: 1rem 0;
  }
}

.address {
  line-height: 2rem;

  &Textarea {
    display: flex;
    flex-direction: column;
    justify-content: center;
  }

  th {
    text-align: left;
    line-height: 2rem;
    display: flex;
    align-items: flex-start;
  }
}

#after {
  .address {
    line-height: 2rem;
    position: relative;
    width: fit-content;
    overflow: hidden;
  }

  textarea {
    resize: none;
  }

  .container {
    position: absolute;
    top: 0;
    right: 0;
    width: 100%;

    .underline {
      position: absolute;
      bottom: 0;
      left: 0;
      width: 100%;
      border-bottom: 1px solid #00307D;
    }
  }
}

form {
  text-align: center;
  margin: 3rem 0;

  input {
    padding: 5px 8px;
    background-color: #00307D;
    border: none;
    color: white;
    transition: .5s;

    &:hover {
      background-color: #666666;
    }
  }
}

@media print {
  textarea {
    border: none;
    resize: none;
  }

  form {
    display: none;
  }
}

@page {
  margin: 0;
}